Welcome to the first of hopefully many tutorials that will teach you how to make amazing things inside the Planetoid Pioneers editor! I will start off with a very basic object, a grenade, which we will create using both the in-game editor and some introductory Lua scripting.
In addition to reading this tutorial, I highly recommend checking out the C2D documentation for a list of all engine functions. You will find them in PPTest\Docs\LuaManDocs.html. Ctrl + F will be your friend.
What can you build with Planetoid Pioneers?
A lot. Every blueprint in Planetoid Pioneers (these objects you can build or spawn from the editor) has a Lua script attached to it which controls what it does. Lua is a fast, easy and very accessible scripting language.
 |
 |
 |
That means you can change a blueprint and make them obey to your code! Of course you can also create entirely new weapons, Pioneers, vehicles, scenarios, enemies with AI and whatever else you can think of with the power of Data Realms’ Crush2D at your fingertips.
What we are going to do?
Let’s start by turning a regular bomb into a throwable grenade. To do this we will go through every step necessary to create a new blueprint in Crush2D. We will create the blueprint, make it usable by the Pioneer, add Lua script to it and finally have a look at how to find and solve errors.
When we are done you will be able to realize your coolest ideas in Planetoid Pioneers!
Remember, you will need no additional tools for writing code, because Planetoid Pioneers conveniently has a modded version of ZeroBraneStudio packaged with it which has some extra features for Crush2D development that will be very helpful for you.
Have fun!
Editor Overview
I am going to give you a quick overview of all the functions the editor has. If you want a more detailed look you can watch Datas video. If you are already familiar with the editor you can skip this part.
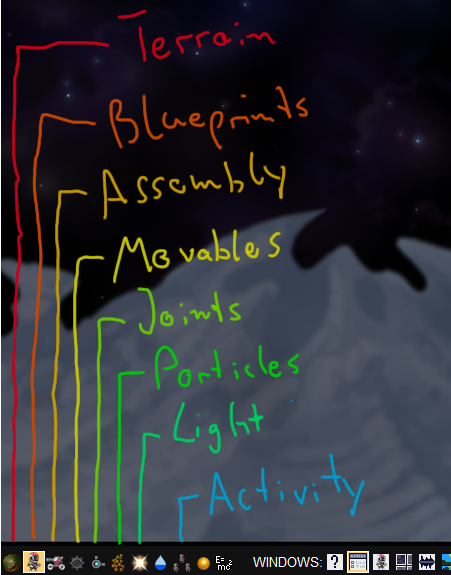
Objects in Crush2D are grouped into different categories like movable objects, terrain objects, lights, particles, etc. The edit modes are grouped in the same way.
You have one edit mode for each kind of object, where you get extra information about these in the scene and can move them around.
If you want to change something about an object you can open it in the editor (F2). The editor is grouped in the same categories.
In addition to that you have different widows like the help window (F1), the sound window (F4) where you can select sounds and set the volume of the game or the blueprint library (F6) where you select blueprints and spawn or edit them.
Creating the Blueprint
We will start by creating the Blueprint for our grenade. If you want to skip this part or run into any trouble just jump to “Lua Scripting for Crush2D” and download the complete blueprint there to start writing code for it.

Start up Planetoid Pioneers and enter the edit mode(F2). Open the blueprint library(F6) in it look for the bomb click on it and press load to editor. The blueprint (bp), all its particles, joints etc. are now loaded to the blueprint editor where you can change various properties of the object.
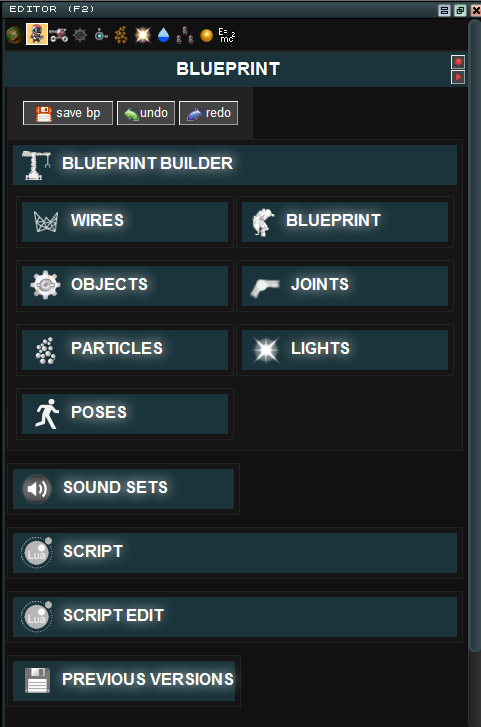
Click on the blueprint tab and change the blueprint name to “Tool Grenade” its important that you keep “Tool “ as first letters for all tools because thats how the Pioneer detects what he can pick up at the moment. Set the blueprint type to “Tool”. Feel free to change the texture in objects. Finally click on “save bp” in the top.
Next we have to add joints which will be mounted to the hands of the Pioneer when he picks up the grenade. Or puts it on his back. You can place the joints in the blueprint editor (Ctrl + F2). To do so press the plus button, copy the names from the screenshot, press the “#” symbol to mount them to the bomb and then place the FG joint on the left and the BG on the right. Make sure to have 0 as second value for A pos like I do so the grenade is held the right way.

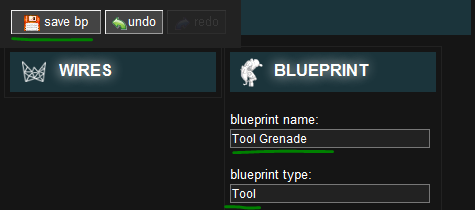
Now save your blueprint and scroll down and click on “Script Edit” and then on “edit external script”.
Now ZeroBraneStudio should open with a tab called Tool Grenade.lua. and we can finally start writing our own code! If you game is stuck now go into ZeroBrane and press Shift + F5 to stop the debugger. I will explain later what that is.
One more tip before the coding starts! Everytime you change the code of your blueprint the scene has to reload (all done automatically on saving the script). That means you will have to watch the emergency dropship crash at the start of the game every time you change code and that will cost time.
To save that time, change your scene for faster testing. To do so save the scene under a different name in the scene editor, open the activity editor and remove all the code there (which places you in the ship at the start every time). Now zoom out and place your Pioneer (he is somewhere in the sky) at the ground and put the grenade next to him so you can pick it up instantly. Remember to save the scene again.

Lua Scripting for Crush2D
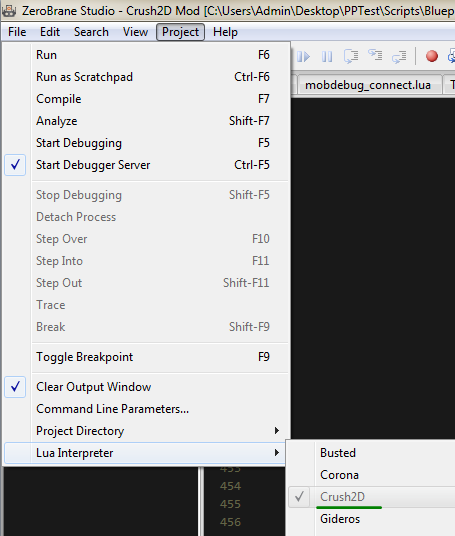
If you skipped the previous part you can download the blueprint you should now have here, just drag the image right into your game. First set the interpreter in Project -> Lua Interpreter -> Crush2D. This will give you code snippets for the all the C2D functions.
Lets have a look at the very basic syntax of a blueprint (BP). A BP has two basic functions which are going to be called by the engine, namely Blueprint:Build and Blueprint:Update.

For the sake of this tutorial, we will start from scratch so delete everything and start by adding the following code:
function Blueprint:Build()
  -- do this once when the object is created
  -- declare some variables
  -- declare some functions
end


function Blueprint:Update()
  --do this every frame (many times a second)
end
Now because what we are going to create is a tool we will have functions that can be called by the Lua script of the Pioneer using the tool when the player presses a button or clicks his mouse for example. These functions can be declared in the Blueprint:Build() function.
function Blueprint:Build()
  -- do this once when the object is created
  -- declare some variables

  -- declare some functions
  self.OnToolActivate = function()
  end

  self.OnToolDeactivate = function()
  end

  self.ToolLeftButtonPress = function()
  end

  self.ToolLeftButtonHold = function()
  end

  self.ToolLeftButtonRelease = function()
  end

  self.ToolAimPoint = function(tool_aim_point)
  end
end
Adding Functionality
Ok, lets start by Releasing the grenade when the left mouse button is released (self.ToolLeftButtonRelease = function ()).
To do so we need to Unmount (destroy the joints between) the two assemblies. This can be done with functions which Crush2D provides.
self.ToolLeftButtonRelease = function()
	--find the pioneer who is carrying the grenade
	local pioneer = self:GetMountedToAssemblyByAT("Pioneer")

	--destroy all jointed connections between both assemblies
	self:UnmountFromAssembly(pioneer)
end
To find the Pioneer we will use a function which returns what our assembly, the grenade, is mounted to.
self:GetMountedToAssemblyByAT("Pioneer")Now we just need to unmount the grenade from the Pioneer via self:UnmountFromAssembly(Pioneer) You can save your code now and test your grenade drop with a left click.
If you haven’t placed your grenade in scene already you have enter edit mode (F2) and drag and drop it into the game in front of the pioneer.

Next we need to give the grenade a push when its dropped depending on where the player is pointing his mouse to. First we are going to add a function which is going to be called by the Pioneer with the coordinates of the players aim so we can store them.
self.ToolAimPoint = function(tool_aim_point)
	--store the world coordinate of the mouse
	self.aim_point = tool_aim_point
end
Next we need to declare some variables which we are going to need. They are a stored as part of self which is a table object containing all the information of our assembly.
function Blueprint:Build()
  -- do this once when the object is created

  -- declare some variables
  self.explosionDelay = 3
  self.throwingPower = 20
Now we need to find the velocity which we have to give the object so it flys to the direction of the mouse. We will describe the velocity as a vector.
self.ToolLeftButtonRelease = function()
--find the pioneer who is carrying the grenade
local pioneer = self:GetMountedToAssemblyByAT("Pioneer")
--destroy all jointed connections between both assemblies
self:UnmountFromAssembly(pioneer)
--find the one and only movable object of this assembly
local grenade = self:GetMOByName("Bomb")
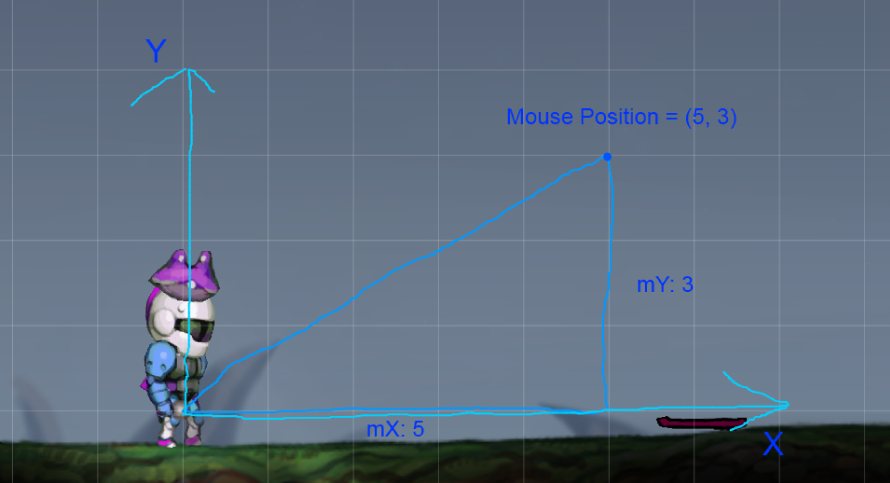
--calculate the difference between mouse and grenade position to apply it as velocity
local vel = self.aim_point - grenade:GetPosition()
endAll this is part of our ToolLeftButtonRelease() function. To calculate the velocity vector pointing away from the grenade to the mouse we substract both values.
This is what our vector in the coordinate system of the grenade looks like.
Now we need to normalize the vector to our throwingPower. Which means we set the length of the vector to throwingPower so we can use this vector as our velocity for the unmounted grenade.

self.ToolLeftButtonRelease = function()
	--find the pioneer who is carrying the grenade
	local pioneer = self:GetMountedToAssemblyByAT("Pioneer")

	--destroy all jointed connections between both assemblies
	self:UnmountFromAssembly(pioneer)

	--find the one and only movable object of this assembly
	local grenade = self:GetMOByName("Bomb")

	--calculate the difference between mouse and grenade position to apply it as velocity
	local vel = self.aim_point - grenade:GetPosition()

	--normalize the vector,
	--so it keeps its direction but has a magnitude of our throwing power
	vel:NormalizeTo(self.throwingPower)

	--set the velocity of the grenade and give a nice rotation
	self:SetVelocity(vel , 10)
end
Ok, our grenade is now throwable! Next we need to add a timer for the explosion and add the explosion itself of course. We check if the time is nil (empty) to make sure to not overwrite the old timer.
self.ToolLeftButtonPress = function()
	--only start a timer if none is there yet
	if not self.timer then
		--create a timer
		self.timer = self:CreateTimer()

		--set the time
		self.timer:SetTimer(0, self.explosionDelay)
	end
end
The timer is going to start counting when the left mouse is pressed so the grenade can be held in the hands while its ticking. Crush2D provides timer functionalities for us which we can use. The timer count starts with 0 and will take 3 seconds or whatever else you have set for self.explosionDelay previously.
No we need to define self.explode(). Which we will call after the timer is over to explode the grande. We will use the same code the bomb is using to explode but feel free to come up with whatever you like.
function self.explode()
	local bomb = self:GetMOByName("Bomb")
	local ps = self:GetPSByName("Boom")
	if ps ~= nil then
		-- emit boom particles
		ps:EmitBoom()
		-- then delete the ps when it contains no more particles
		ps:SetDeleteWhenEmpty(true)
		-- make explosion wave
		scene:MakeExplosionWave(bomb:GetPosition(), 10, 150000)
		-- we now unlink the PS from self so it is no destroyed with self
		-- (bomb object disappears immediately, but boom particles stay in game)
		self:UnlinkPSAndFromMO(ps)
	end
	-- make a light flesh
	local light = self:GetLightByName("Flash")
	if light ~= nil then
		-- we now unlink the light from self
		self:UnlinkLightAndFromMO(light)
		-- we switch on that light now
		light:SwitchOn()
		-- make flash effect with light
		light:MakeFlash(0.03,0.17,0.10,true)
	end
	-- self will delete self from simulation (not immediately, flags to delete it)
	-- the unlinked PS and light stay in simulation
	-- and the rest we don't need anymore (self, MO)
	self:DestroyAssembly()
end
Finally we frequently check in Blueprint:Update() if the time is over.
function Blueprint:Update()
	--do this every frame (many times a second)

	if self.timer and self.timer:TimeIsUp() then
		self.explode()
	end
end
If the time is up we will call a self.explode to explode the grenade. We also check for the timer itself first because calling timer:TimeIsUp() on a non existent timer will cause an error. If self.timer is not evaluated as true, timer:TimeIsUp() will not be evaluated and therefore raises no error.

And thats it. Hopefully everything is working for you, if not you can check out the whole source code or download the complete blueprint of the grenade here (drag the image into your game).
Make sure to share your blueprint! (You will find it in PPTest/Blueprints)
Challenges:
- Change the force so the grenade flies into space
- Change the timer to explode upon throwing ;)
- Turn your grenade into fireworks with self:GetPSByName(“Boom”):SwitchONParticleEmitting()
Solving Errors and the Debugger
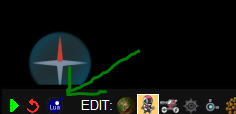
Whenever something does not work with your code you will see this message appear at the bottom right.

If you press Ctrl + F8 you will see the error right in the game. Look for the first part which is underlined in green that shows the the file and the line where the error occurred. Behind that you will see a description of the problem that occurred. In this case timer could not be found. No worries you will get used to understanding these error messages.

If you have trouble finding the cause of your error you might want to use the debugger. The debugger will go through your code line by line as it happens and shows you the contents of all your variables and lets you change them while its running as well.
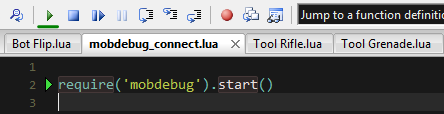
To start debugging press the button marked on the right.
Now that it is in debug mode ZeroBrane will show you which line you are with the green pointer. Press the marked button or F5 to keep it running.
You can now set a breakpoint at which your pointer will stop so you can inspect the current values of your variables, tables, etc.
Place your breakpoint by clicking next to the line number or pressing F9. This will hold the execution of the code and therefore the whole game as soon as the breakpoint is reached.

You can now inspect variables and step through the code line by line and into each function as well if you want.

To see the contents of your variables you can open the stack (Ctrl + Shift + S) and see everything, add single variables to the watch to keep track of them or hover over one to inspect it quickly.
To step to the next line press F10. To continue running normally press F5.
If you want to make changes you have to stop the debugger, do your changes and if needed start it again with the button I showed earlier.
For more info on debugging you can check out the ZeroBraneStudio documentation.
Congratulations!
You have gone through every step necessary to create a new blueprint in Crush2D. You created your blueprint, made it usable by the Pioneer, added Lua script to it and finally learned how to find and solve errors.
To learn more, analyze other blueprints that interest you and use the things you have found out in yours. In addition to that I recommend checking out the documentation if you haven’t so far at PPTest\Docs\LuaManDocs.html. If you get stuck just ask. Now go and create whatever you have dreamed of!
Thanks to Vlad, abdulalhazred and Janeator for helping me!